Finding your way around: find, mdfind, and locate
find
find“walks a file hierarchy.” You can always search for files using Spotlight, but it is' easy on your Terminal as well.find path/to/search -name name_to_search_forto search for a specific file namefind / -name name_to_search_forto search your entire computerfind ~ -name name_to_search_forto search your user directoryfind path/to/search -iname name_to_search_for– add the-iflag to do a case-insensitive match.find path/to/search -size name_to_search_forto search for a specific file sizefind path/to/search -type name_to_search_forto search for a specific file type
As usual, there are many other search options that running man find will showcase, and they can be stacked together to filter results.
mdfind
mdfind query“finds files matching a given query” as per its manual. It uses metadata to search for queries, so it is basically a shell for your Spotlight search. Metadata, or data about data itself, is at the core of Spotlight – that is how pressing⌘ space barand entering ‘Ruby’ will show you a list of all documents that mention Ruby.mdfind querynote that the query does not have to be 1 word, but can be several.mdfind imagewill find all image files (if you run it from any directory, it will still search for all images for an existing user, just like Spotlight does). If you run it, and it starts giving you an endless output of image file paths, just runCtrl + Cto stop it.mdfind image -onlyin path/to/directorysearches for all images in a certain directory

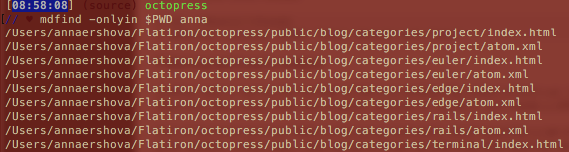
mdfind *query* -onlyin path/to/directory/1 -onlyin path/to/directory/2paths can be stacked just like other queries.mdfind query -onlyin $PWDto search in a current directory.
mdfind query -livewatches outcome of a search for a certain query. So if a file with a matching metadata is added, the terminal tab/window in which you are running that command will show that file.
Boolean operators and mdfind:
You are probably familiar with boolean operators if you are developer. mdfind uses a very simplified version of them:
mdfind query1|query2– OR; note no whitespacemdfind query1(-query2) – excludes query 2; note no whitespaceUse
()to group queries. To find matches to 2 queries, usemdfind (query1 query2)** asmdfind query1 query2will only search for the second word.Use
""to escape apostrophes, otherwise your Terminal will think your query is incomplete.

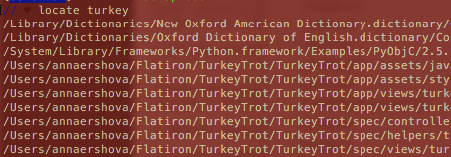
locate
locate“find filenames quickly.” Quickly is the keyword here. It relies on an index database of all filenames to find the one you need. Think of it as a cookbook index: instead of parsing throughout every recipe that uses shiitake mushrooms, you go straight to the index in the back. look for shiitake, and it tells you where to look for it. The problem with it is that the index is only updated once a week or so, so if you are looking for a newly created file, it may not come up.
- Using
locatefor the first time ever or after a major system update can cause a following error: “WARNING: The locate database (/var/db/locate.database) does not exist.”

Follow the instructions to generate an index database; it will take some time to run as it will go through every file on your system to generate its index (in cookbook terms, someone had to go through and read every recipe and list every ingredient in the index.) It actually does not alert you to the fact it is being generated in the background, but it should work fine and if you run the command again an hour or so later, the database should be there.
You can receive instructions your index database is outdates, in which case you similarly need to follow instructions to rebuild it.
- Note that both
findandlocateare case-sensitive when it comes to file names. Use-iflag to make them case-insensitive.